Overview
This tutorial makes a flow that starts to bring in data from external sources to do something useful locally.
The flow will:
- Retrieve information from a website at a regular interval
- Convert that information into a useful form
- Display the result in the Debug sidebar
1. Add an Inject node
In previous tutorials, the Inject node was used to trigger the flow when its button was clicked. For this tutorial, the Inject node will be configured to trigger the flow at a regular interval.
Drag an Inject node onto the workspace from the palette.
Double click the node to bring up the edit dialog. Set the repeat interval to every 4 seconds.
Click Done to close the dialog.
2. Add an HTTP Request node
The HTTP Request node can be used to retrieve a web-page when triggered.
After adding one to the workspace, edit it to set the URL property to:
https://earthquake.usgs.gov/earthquakes/feed/v1.0/summary/significant_week.csv
Then click Done to close the dialog.
This URL is a feed of significant earthquakes in the last 7 days from the US Geological Survey web site. The site offers a number of other options that you may want to play around with after completing this tutorial.
3. Add a CSV node
Add a CSV node and edit its properties. Enable option for ‘First row contains column names’.
Then click Done to close.
4. Add a Debug node
Add a Debug node to the output.
5. Wire them all together
Add wires connecting:
- The Inject node output to the HTTP Request node input.
- The HTTP Request node output to the CSV node input.
- The CSV node output to the Debug node input.
7. Add a Switch node
Add a Switch node to the workspace. Edit its properties and configure it to check the property msg.payload.mag with a test of > change it to test on a number and the value 6. Click Done to close.
Add a second wire from the CSV node to this Switch node.
8. Add a Change node
Add a Change node, wired to the output of the Switch node. Configure it to set msg.payload to the string BIG EARTHQUAKE FOUND!.
9. Add a Debug node
Wire a new Debug node to the output of the Change node.
10. Deploy
Deploy the flow to the runtime by clicking the Deploy button.
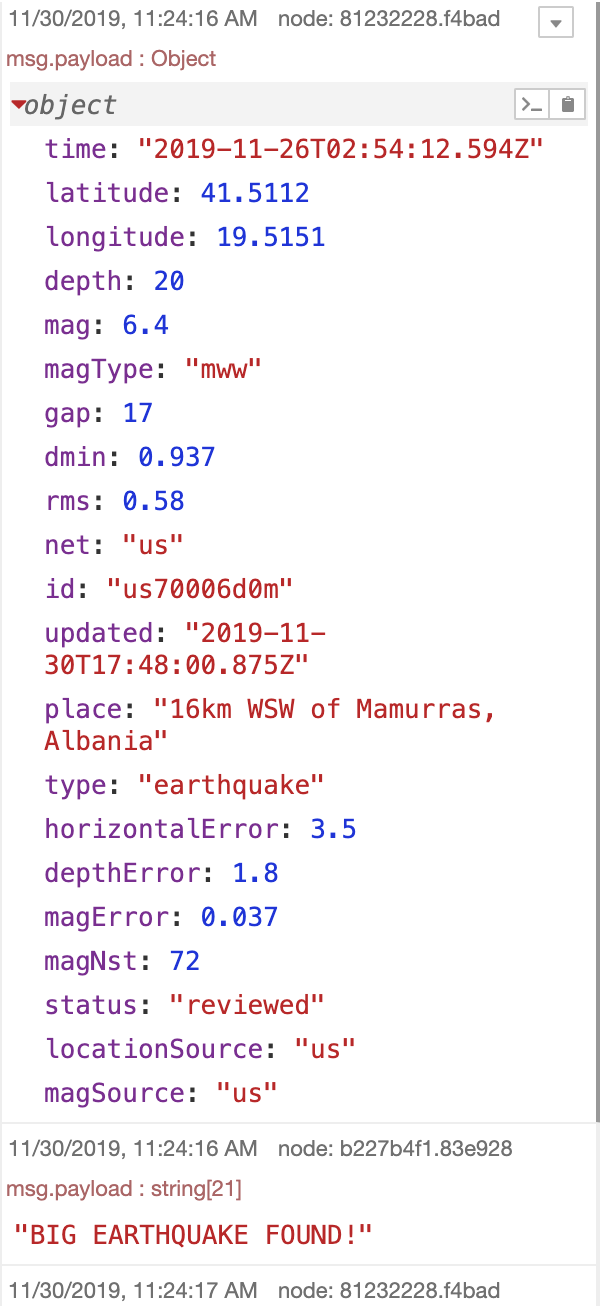
With the Debug sidebar tab open click the Inject button. You should see a list of entries with some contents that look like:

If there were any quakes with a magnitude greater than 7 you will also see debug messages like:
msg.payload : string(6)
"BIG EARTHQUAKE FOUND!!"
Summary
This flow is automatically triggered every 5 minutes and retrieves data from a URL. It parses the data and displays in the Debug sidebar. It also checks the magnitude value in the data and branches the flow for any messages with a magnitude greater than 6. The payloads of such messages are modified and displayed in the Debug sidebar.
Source

The flow created in this tutorial is represented by the following JSON. To import it into the editor, copy it to your clipboard and then paste it into the Import dialog.